Using Gitlab's Free Shared Runners for CI/CD
Problem
CI/CD involves the frequent and rapid integration of code and the delivery of new releases. CI/CD makes the process from coding to deploying applications faster and more automated.
Typically, we go through steps such as writing code -> testing (unit testing) -> code commit -> build -> deploy... But with integrated CI/CD, many steps in the code writing -> deployment process can be automated.
CI/CD is supported on code management platforms like Gitlab, Github... and is triggered by events like code commit. To use CI/CD, Runners need to be set up to connect to your account. The Runners play a role in processing your code and application logic.
In this article, I will discuss how to use Gitlab's Shared Runner.
Gitlab Shared Runner
If you use Gitlab for code management, you can use Shared Runners with free time of up to 400 minutes for Private projects and unlimited for Public and Community projects.
It may not seem like a lot, but for personal projects that save costs and can integrate CI/CD, it is worth using. My blog is currently using this method for automated deployment to the Development environment.
To activate Shared runners, go to Project > Settings > CI/CD and check Enable shared runners for this project.
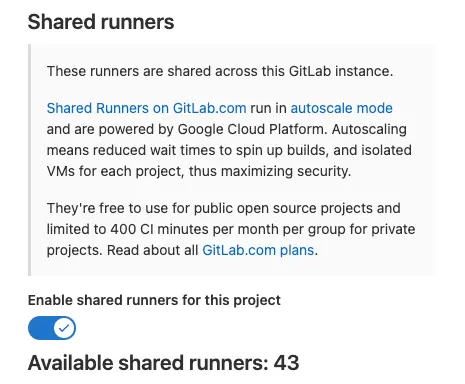
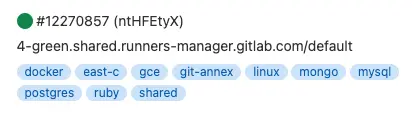
Below the Available shared runners, you will see the number of Shared runners provided by Gitlab along with their statuses. Pay attention to the "label" below each Runner, as we will need it to specify the necessary Runner for each stage's usage.
How to use
.gitlab-ci.yml is the yml file to activate Gitlab's CI/CD. It contains the configuration and directives for our automation process.
The 2coffee blog uses Docker to build and push the image to the Gitlab registry, then sends an HTTP request to the server to update the service, creating a complete CI/CD process.
I divide it into 2 stages: build/push image and HTTP request:
stages:
  - build
  - curl-docker-ci
In the build stage, the Runner that supports Docker is used, so I set the tags as docker. Parameters such as login information/registry password are passed through Variables, which are set up in Gitlab. Instead of specifying the steps to build & push the image directly in the yml file, I created a file named build-dev.sh which contains bash commands to build & push the image.
Lastly, since I only want to set up CI/CD for the Development environment, I specify that CI should only run when code is committed to the develop branch.
docker-build:
  stage: build
  image: docker:20.10.9
  tags:
    - docker
  services:
    - docker:dind
  before_script:
    - echo "$DOCKER_REGISTRY_PASS" | docker login $DOCKER_REGISTRY --username $DOCKER_REGISTRY_USER --password-stdin
  script:
    - if [ "$CI_COMMIT_REF_NAME" = "develop" ]; then
      ./build/bin/build-dev.sh;
      fi
  only:
    - develop
The content of build-dev.sh is simple:
#!/bin/sh -e

IMAGE=registry.gitlab.com/2coffee/page
VERSION=dev

name=${IMAGE}:${VERSION}

docker build -t ${name} -f ./Dockerfile .

docker push ${name}
In the next step, I also run a curl-docker-ci.sh file that contains the CURL command for an HTTP request to the server to update the service. Since this bash command only needs a Linux environment to run, I specify the tags as linux.
curl-docker-ci:
  stage: curl-docker-ci
  tags:
    - linux
  script:
    - ./build/bin/curl-docker-ci.sh
  only:
    - develop
curl-docker-ci.sh simply contains one curl command:
#!/bin/sh -e

curl --location --request POST $DOCKER_CI_ENDPOINT \
--header "Authorization: Basic $DOCKER_CI_BASIC_AUTH" \
--header 'Content-Type: application/json' \
--data '{"name": "'$DOCKER_CI_SERVICE_NAME'"}'
Putting it all together, I have a complete .gitlab-ci.yml file like this:
stages:
  - build
  - curl-docker-ci

docker-build:
  stage: build
  image: docker:20.10.9
  tags:
    - docker
  services:
    - docker:dind
  before_script:
    - echo "$DOCKER_REGISTRY_PASS" | docker login $DOCKER_REGISTRY --username $DOCKER_REGISTRY_USER --password-stdin
  script:
    - if [ "$CI_COMMIT_REF_NAME" = "develop" ]; then
      ./build/bin/build-dev.sh;
      fi
  only:
    - develop

curl-docker-ci:
  stage: curl-docker-ci
  tags:
    - linux
  script:
    - ./build/bin/curl-docker-ci.sh
  only:
    - develop
Now, let's try committing code to the develop branch and go to Project > CI/CD > Pipelines to see if the CI is activated.

Conclusion
CI/CD is the process of frequent and rapid integration and delivery of new releases. Thanks to CI/CD, many steps from coding to deploying applications can be automated.
If you use Gitlab for code management, you can use up to 400 minutes of free CI/CD. Although it may not seem like a lot, you can register a Runner to remove this limitation.

5 profound lessons
Every product comes with stories. The success of others is an inspiration for many to follow. 5 lessons learned have changed me forever. How about you? Click now!

Subscribe to receive new article notifications

Comments (3)
Cho mình xin cách dùng curl để update service với ad
Cho mình xin cách dùng curl để update service với ad
À mình viết một rest service bằng docker sdk để chọc vào docker mà update service thôi đó bạn
Cảm ơn ạ
Không đăng nhập được bằng github ad ơi
Không đăng nhập được bằng github ad ơi
Ok bạn mình kiểm tra lại ạ
Bạn có bài viết nào nói về ci cd không
Bạn có bài viết nào nói về ci cd không
Chào bạn, hiện chưa có ạ