Some tips on package.json and package-lock.json for more effective use of npm
Problem
npm is a massive package manager for all developers. It allows you to share, download, and use libraries in your projects. You can even "borrow" npm to create private repositories circulated internally.
However, when a project uses too many dependencies, it becomes a "dependency nightmare". You cannot actively manage third-party packages on npm. One day, the package you are using may have errors, be deleted, be hacked, etc., causing potential risks to your own project.
In fact, I have encountered many issues related to the versions of dependent packages. One common reason is that although the development and production environments use the same packages, for some reason, one of them seems to not work the same.
It seems deep, but agreeing to use a package also means accepting some risks. These risks can be partially limited if you continue reading the article below.
Semver
First of all, you will be more effective in working with packages if you know about semver. npm encourages packages to adhere to semver, if they comply or strictly adhere to it, many troubles will disappear.
In essence, semver introduces a versioning structure MAJOR.MINOR.PATCH, which increases according to the following rules:
- MAJOR version number: When you have major API changes that are not compatible with the previous version.
- MINOR version number: When you add backward-compatible functionality to the previous version.
- PATCH version number: When you make a backward-compatible bug patch to the previous version.
An example of a valid semver version is 1.0.0, 1.0.0-0...
npm adheres to semver to the extent that it can automatically upgrade the version to the MINOR every time you use the npm install command. Because upgrades at the PATCH or MINOR level are likely to be backward compatible. Although the changes are not known, npm "thinks" that the new version is "worthwhile" than the old version.
That is in theory, in reality, the development team is the one who decides whether to comply or not. Whether intentionally or unintentionally not adhering to semver, that package can destroy your project. Imagine what would happen if they released a PATCH version but deleted or changed a backward-incompatible function before.
package.json and package-lock.json
package.json is an important file in the project. It provides a lot of information, as well as instructions for the project to work. One of those is that it manages the dependencies along with their versions.
{
  "dependencies": {
    "dayjs": "^1.11.7"
  }
}
Parallel to package.json is package-lock.json. Many people don't know the real purpose of it if they don't bother to find out. package-lock.json is generated every time you run npm install, it keeps track of all the dependency information at the time of installation. Regarding the purpose of why a lock file needs to be generated, I'll explain in the section "npm-ci" below.
Some tips for more effective use of npm
package version
Every time you need to install a package, npm install <package> helps you do that. Even if you want to reinstall all the dependencies in the project, conventionally we use npm install.
But have you noticed or wondered why package.json and package-lock.json change every time you run npm install? It's because npm install automatically upgrades the version of the package.
{
  "dependencies": {
    "dayjs": "^1.11.7"
  }
}
Every time you install a package with npm install, it adds the ^ symbol in front of the version with the meaning "allowed to update" the package version.
For example, ^1.2.3 will be updated to any version below 2.0.0-0, ^0.2.3 will be updated to any version below 0.3.0-0...
Another commonly seen symbol is ~, it also allows npm to update the version.
For example, ~1.2.3 will be updated to any version below 1.3.0-0, ~0.2.3 will be updated to any version below 0.3.0-0...
There are many rules, readers can learn more at Advanced Range Syntax.
If you accept version changes when installing, you may not need to worry about anything. But if not, remove the symbols in front of the versions to install the exact versions. Or install the package along with the --save-exact flag:
$ npm install --save-exact dayjs
npm install --production
npm install installs all the dependencies in both dependencies and devDependencies. The devDependencies contains the packages necessary for development and local testing, such as unittest or linting tools. Those packages do not necessarily need to be installed in the production environment, so you can remove them by only installing the packages in dependencies using the --production flag.
$ npm install --production
npm ci
npm ci is similar to npm install, it also installs all the dependencies, but from package-lock.json or npm-shrinkwrap.json. There are several notes when working with package-lock.json, readers can learn more at npm-ci Description. Some special notes are:
- If the dependencies in package-lock.json do not match the dependencies in package.json, npm ci will report an error.
- It never changes package.json or package-lock.json.
npm ci is recommended for use in automated environments such as testing platforms, continuous integration, and deployment -- or any situation where you want to ensure you are doing a clean install of your dependencies.
Even in production, you should still use npm ci to install the exact versions of the packages. Avoid the case of working fine in development but encountering errors in production. Similarly to npm install, use the --production flag to install the packages in dependencies.
$ npm ci --production
npm outdated
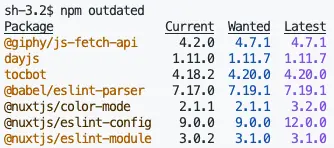
If you "fix" the versions of the packages, how do you know which packages have updates? That's when npm outdated comes to help. Run it whenever you need to check for updates. The command provides information about the current version, the backward-compatible MINOR version, or the comprehensive MAJOR version update.

Be cautious with the MAJOR versions because they often come with very large changes that can break your current project. MINOR or PATCH updates are usually safer. However, avoid upgrading all package versions at the same time. Instead, upgrade one package first that you think is safe, if an error occurs, it will be easier to trace which package is incompatible and roll back in a timely manner.
npm audit
With too many packages, and each package includes many dependencies, the "dependency nightmare" is born from that. One issue related to it is security. What will happen if a package used by many other packages has a security vulnerability? npm was soon concerned about this issue, hence the tool provides a feature to "scan" for vulnerabilities in the package and its dependencies.
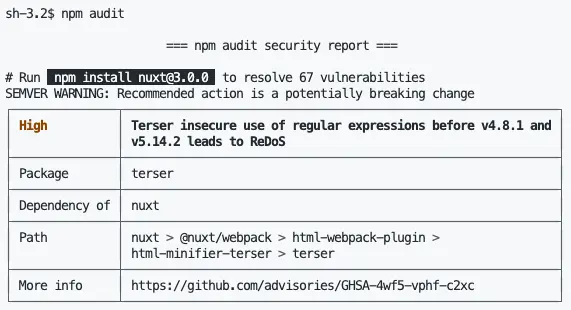
$ npm audit

When running npm audit, npm lists all the packages along with their dependencies that have security vulnerabilities. The information displayed is quite clear, including the "severity" of each vulnerability, detailed information (More info), how to resolve it (# Run ...), and some other information.
To fix all the vulnerabilities, you run the fix command.
$ npm audit fix
Essentially, npm audit fix runs the npm install <package> command below. It is similar to the command in # Run. Therefore, some packages may require a MAJOR version change to fix the vulnerability. At that time, npm audit fix will not inconveniently update the MAJOR version and risk breaking the entire project. However, if you know what you are doing and ignore the warning, you can use the --force flag to accept the fix.
$ npm audit fix --force
Summary
npm encourages developers to assign versions to packages according to the semver rules. Many troubles when using npm and the packages on it come from versions, the "dependency hell" also contributes to those troubles. Hopefully, this article provides readers with a perspective on package versions along with some npm usage methods to partially address the mentioned issues.
The secret stack of Blog
As a developer, are you curious about the technology secrets or the technical debts of this blog? All secrets will be revealed in the article below. What are you waiting for, click now!
Subscribe to receive new article notifications
Comments (0)